
|
Print address label, cards and more.
Get data from MS Excel, MS Access and print on your labels! |
|


|
||
Take Video Tutorials for our products to find out most of your answers. It is a step by step guide to show you how you can do most of work. It's easy, it's fun, just click and watch!
Some Questions and Answers - May help you!
- What payment options are available?
- What currencies do you accept?
- How can I place an order?
- What will happen after I place my order?
- When will I receive my product?
- How do I get any special discounts?
- How can I place a purchase order?
- How will the charge appear on my credit card /debit card statement?
- Can I get the product on a CD-ROM?
- When will I receive my CD-ROM on Demand?
- What will I receive if the product is delivered by e-mail?
- How secure is my online order?
- Will my personal data be shared with any third parties?
- Can I save my card as PDF file or Image file?
- I see a slight misalignment while printing. What are the other ways to print?
- How do I add/remove back side of my card?
- How do I print back side of my card?
- Why do the shadows not show up even if I choose 'show shadow' on the properties window?
- Can I create a vertically aligned card or a custome size business card?
- I choose a background color, but doesn’t show up. Why?
- I saved my design as a template, but does not show up in the "New Card Template" window. What's wrong?
- I closed the property window. How do I get it back for changing the properties(color, size, tilt angle etc.) of an element?
- How can I send my design to someone by email who does not have this software?
- How do I use new font with the application?
- I cannot move or resize some elements in my design. Why?
- I have some elements that are outside the design area. Will they show up on my printed card?
- What graphic file formats are supported by Belltech Business Designer Pro?
- How do I use an image file that is in an unsupported format?
- What type of paper do I buy to print business cards?
- 'Save as Image' does not save the background image. How do I do it?
- I would like to save my card as a high resolution image and then get it printed from a printshop. How can I do this?
- After entering text or in print i see dots appearing, not the whole text. How can I fix this?
- How can i add ©, ®, TM, bulletted item list or other symbols?
- How do I change the size of a photo or text or any element?
- How do I use my letterhead with Microsoft Word document?
- How do I print a list of name badges on the same page?
- I closed the property window. How do I get it back for changing the properties(color, size, tilt angle etc.) of an element?
- How can I send my design to a printshop for professional printing?
- How do I use new font with the application?
- How do I use an image file that is in an unsupported format?
- How do I print only one label at a specified location on my sheet?
- How do I connect to my data files?
- What types of data files are supported?
- I want to print address labels from my Excel files. Do I need to know SQL?
- How do I convert my date to format like January 5, 2005 or 01/05/2005 etc.?
- How do I join 2 fields into one. Like FirstName, LastName into one single line, or Addrs1, addrs2 into one field?
- How do I add automatic label counter, like 1 of 100, 2 of 100 or 1/100 ?
- How can I pull data from 2 or more sheets from a single Excel file?
- How do I connect to my data files, Access or Excel sheet?
Please refer to CaptureXT help pages.
You can also send us a Personal or Company Checks, Money Orders for your purchase. To do that please send your Checks/Money Orders to this address with details:
Belltech Systems
4580 Klahanie Dr. SE # 245
Issaquah
WA-98029, USA

Q. What currencies do you accept?
US Dollars, Euro, Pound Sterling, Australian Dollars, Japanese Yen, Canadian Dollars or Swiss Francs.
Q. What will happen after I place my order?
Please make sure that you are not blocking emails from belltechsystems.com.
Q. When will I receive my product?
Q. How do I get any special discounts?
Q. How can I place a purchase order?
Belltech Systems
4580 Klahanie Dr. SE # 223
Issaquah
WA-98029, USA
Please contact us for any questions.
Q. How will the charge appear on my credit card /debit card statement?
Q. Can I get the product on a CD-ROM?
Q. When will I receive my CD-ROM on Demand?
Q. What will I receive if the product is delivered by e-mail?
You will also receive user guide documentation, extra graphics and templates for some products. Please make sure that you are not blocking emails from belltechsystems.com.
Q. How secure is my online order?
Q. Will my personal data be shared with any third parties?
D5 Render 2.4 Download 🎁
**Mastering Photoshop CS10: A Comprehensive Guide** Adobe Photoshop CS10 is a powerful image editing software that has been a staple in the creative industry for years. With its wide range of tools and features, it's an essential tool for graphic designers, photographers, and digital artists. In this article, we'll take a closer look at the features and capabilities of Photoshop CS10, and provide tips and tricks for mastering this powerful software. **Getting Started with Photoshop CS10** Before we dive into the advanced features of Photoshop CS10, let's take a look at the basics. When you first launch Photoshop CS10, you'll be greeted with a user-friendly interface that includes a menu bar, toolbar, and workspace. The workspace is where you'll spend most of your time, and it's where you'll find the various tools and panels that you'll use to edit and manipulate your images. **Key Features of Photoshop CS10** Photoshop CS10 includes a wide range of tools and features that make it an ideal choice for image editing and manipulation. Some of the key features include: * **Content-Aware Fill**: This feature allows you to remove unwanted objects or blemishes from an image and fill the area with a matching texture. * **Perspective Warp**: This tool allows you to adjust the perspective of an image, making it ideal for architectural photography and product photography. * **Smart Objects**: Smart objects allow you to apply non-destructive edits to an image, making it easy to experiment with different effects and styles. * **Layer Styles**: Layer styles allow you to add depth and texture to your images, and include options for drop shadows, bevels, and embossing. **Using the Toolbox in Photoshop CS10** The toolbox in Photoshop CS10 is where you'll find the various tools that you'll use to edit and manipulate your images. Some of the most commonly used tools include: * **Selection Tools**: The selection tools in Photoshop CS10 allow you to select specific parts of an image, and include options for rectangular, elliptical, and lasso selections. * **Painting Tools**: The painting tools in Photoshop CS10 allow you to add color and texture to your images, and include options for brushes, pencils, and erasers. * **Retouching Tools**: The retouching tools in Photoshop CS10 allow you to remove blemishes and imperfections from an image, and include options for the spot healing brush and the clone stamp. **Working with Layers in Photoshop CS10** Layers are a fundamental part of working in Photoshop CS10, and allow you to work on different parts of an image separately. Here are a few tips for working with layers: * **Create a new layer**: To create a new layer, go to the Layer menu and select New> Layer, or use the keyboard shortcut Ctrl+Shift+N (Windows) or Command+Shift+N (Mac). * **Merge layers**: To merge two or more layers, select the layers and go to the Layer menu and select Merge Layers, or use the keyboard shortcut Ctrl+E (Windows) or Command+E (Mac). * **Organize your layers**: Use the Layers panel to organize your layers and keep track of which layers you've used. **Tips and Tricks for Mastering Photoshop CS10** Here are a few tips and tricks to help you get the most out of Photoshop CS10: * **Use keyboard shortcuts**: Photoshop CS10 includes a wide range of keyboard shortcuts that can help you work more efficiently. For example, use the spacebar to temporarily switch to the hand tool, or use Ctrl+Z (Windows) or Command+Z (Mac) to undo changes. * **Experiment with different brushes**: The brush engine in Photoshop CS10 is incredibly powerful, and allows you to create a wide range of custom brushes. Experiment with different brush presets and settings to achieve unique effects. * **Use adjustment layers**: Adjustment layers allow you to make non-destructive edits to an image, and include options for adjusting brightness, contrast, and color. **Common Uses for Photoshop CS10** Photoshop CS10 is a versatile software that can be used for a wide range of applications, including: * **Graphic design**: Photoshop CS10 is an essential tool for graphic designers, and is often used to create logos, brochures, and other marketing materials. * **Photography**: Photoshop CS10 is a powerful tool for photographers, and allows you to edit and retouch images with ease. * **Digital art**: Photoshop CS10 is a popular choice for digital artists, and allows you to create complex and detailed artworks. **Conclusion** Photoshop CS10 is a powerful image editing software that offers a wide range of tools and features for graphic designers, photographers, and digital artists. With its user-friendly interface and powerful tools, it's an essential tool for anyone looking to edit and manipulate images. By mastering the features and capabilities of Photoshop CS10, you can take your image editing skills to the next level and achieve professional-looking results. No input data
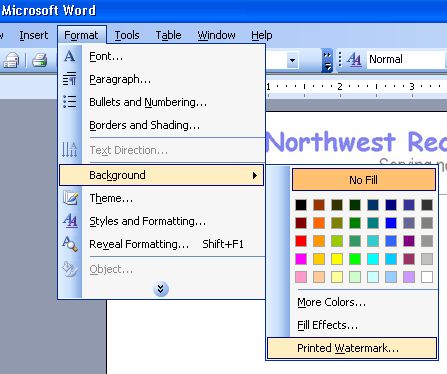
2.Open MS Word(*.doc)
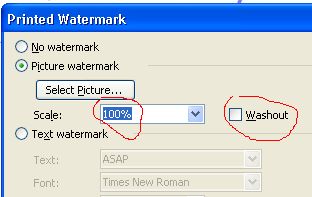
3.In Word Doc, go to menu: Format->Background->Printed Watermark
4.Select a the letterhead image that you saved in step 1.
5.Choose scale 100% and uncheck Washout option. Click OK. You are done.
Q. How do I print a list of name badges on the same page?
Senario-1: You want to print multiple badges with different names.
Solution:
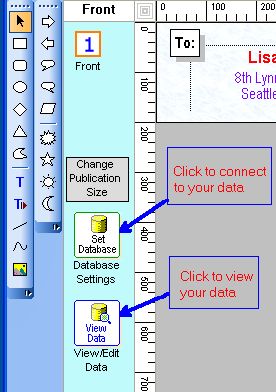
1. You must first have the list of names in a text file or Excel sheet or in a database file.
2. Then you need to connect your datafile as shown here - data connection
If you don't know how to create the txt/csv/xls file, check out these samples:
a. data in plain text file - sample-name-address.txt
b. data in Excel sheet - sample-name-address.xls
c data in csv file - sample-name-address.csv
Senario-2: You want to print multiple badges with same names.
Solution:
Just design one badge and then go to File->print menu and select how many you want to print.
Q. I closed the property window. How do I get it back for changing the properties(color, size, tilt angle etc.) of an element?
Q. How can I send my design to a printshop for professional printing?
Q. How do I use new font with the application?
Q. How do I use an image file that is in an unsupported format?
Q. How do I connect to my data files?
You can also click on menu: File-->Database Settings to set up your data files.
Then go to menu: Insert-->Text From Database to insert a text.
Q. I want to print address labels from my Excel files. Do I need to know SQL?
For most cases SQL knowledge is not required.
Steps to use excel data source:
1. Click on menu: File->Database settings. A Datasource Window appears.
2. Select excel option and browse to your excel file.
3. Now you will see a dropdown with all the excel sheets in the excel file.(an excel file may have one or many sheets)
4. Select the execl sheet you want from the dropdown.
5. Click ok.
At this point you have connected to your excel sheet with your work.
Now go to menu: insert->text from database, and insert an element to your design work. Then go to righthand side's properties area and see a drop down with all the columns in your selected excel sheet. Choose one column and you are done.
Then take a printpreview from file menu.
Q. How do I print only one label at a specified location on my sheet?
Then you choose this option in print window:
No. of rows=8
No. of cols=2
Start printing from row=8, col=2.
See illustrated image. The postion marked yellow will only be printed.
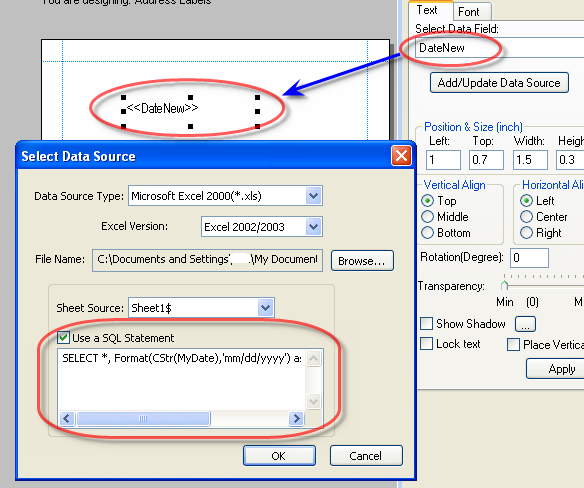
Q. How do I convert my date to format like January 5, 2005 or 01/05/2005 etc.?
SELECT * Format(CStr(MyDate),'mmmm dd, yyyy') as DateNew FROM [Sheet1$]
[This will convert the date to this format: January 5, 2005]
SELECT Format(CStr(MyDate),'mm/dd/yyyy') as DateNew FROM [Sheet1$]
[This will convert the date to this format: 01/05/2005]
You can use many other format strings like Format(CStr(MyDate),'m/d/yy'), Format(CStr(MyDate),'m-d-yy'),Format(CStr(MyDate),'mm-dd-yyyy') etc. Put the SQL statement in the text box as show below:
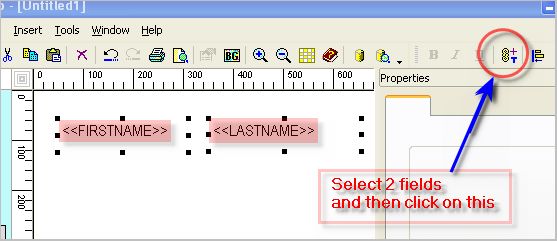
Q. How do I join 2 fields into one. Like FirstName, LastName into one single line, or Addrs1, addrs2 into one field?
Step 1:
Select the 2 fileds(example FirstName, LastName) you want to join by holding "Ctrl" Key and clicking on them.
Step 2:
Then click on the tool button as shown, or select from menu: Tools->Merge selected DB-Texts Select
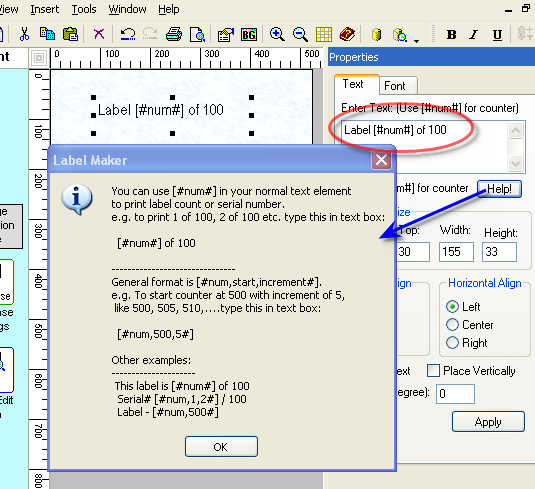
Q. How do I add automatic label counter, like 1 of 100, 2 of 100 or 1/100 ?
SELECT [SheetName$].Name, [SheetAddress$].Address FROM [SheetName$] , [SheetAddress$] where [SheetName$].ID=[SheetAddress$].ID
Q. How do I connect to my data files, Access or Excel sheet?
Click on menu: File-->Database Settings to set up your data files.
Steps 2:
Then go to menu: Insert-->Text From Database to insert a text as shown.
Steps 3:
Then click on the text. You will see "<<TextFromDB>>" .
After that you will see a dropdown in the properties area. In the dropdown you will see all the columns
that your Access Table or Excel Sheet has. Select the column(e.g. Name) to show in this text element.
Steps 4:
Repeat step 2 and 3 to select other columns (e.g, Address, City etc.)
Steps 5:
Go to menu File->Print Preview to see a preview as shown.
If things look fine, print your labels.
|
|
|
home © 2026 — Western Compass | buy | products | services | support | privacy policy | |
|
Copyright © 2001-2009 Belltech Systems, Inc. All rights reserved
|